


Price:
$20.85
(as of Dec 07, 2024 07:00:34 UTC –
Details
)

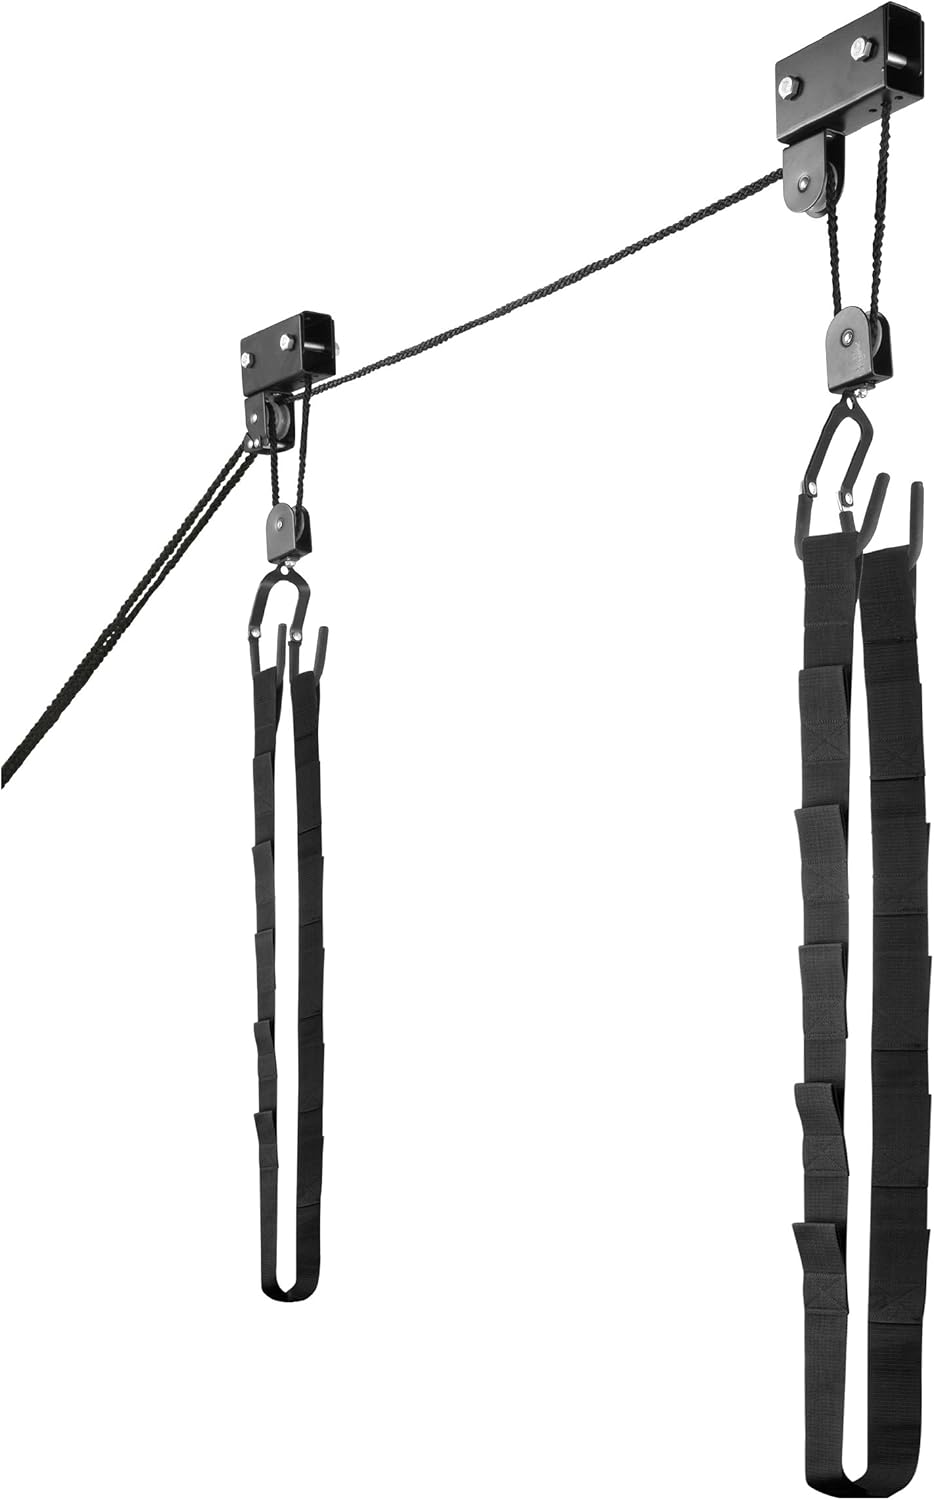
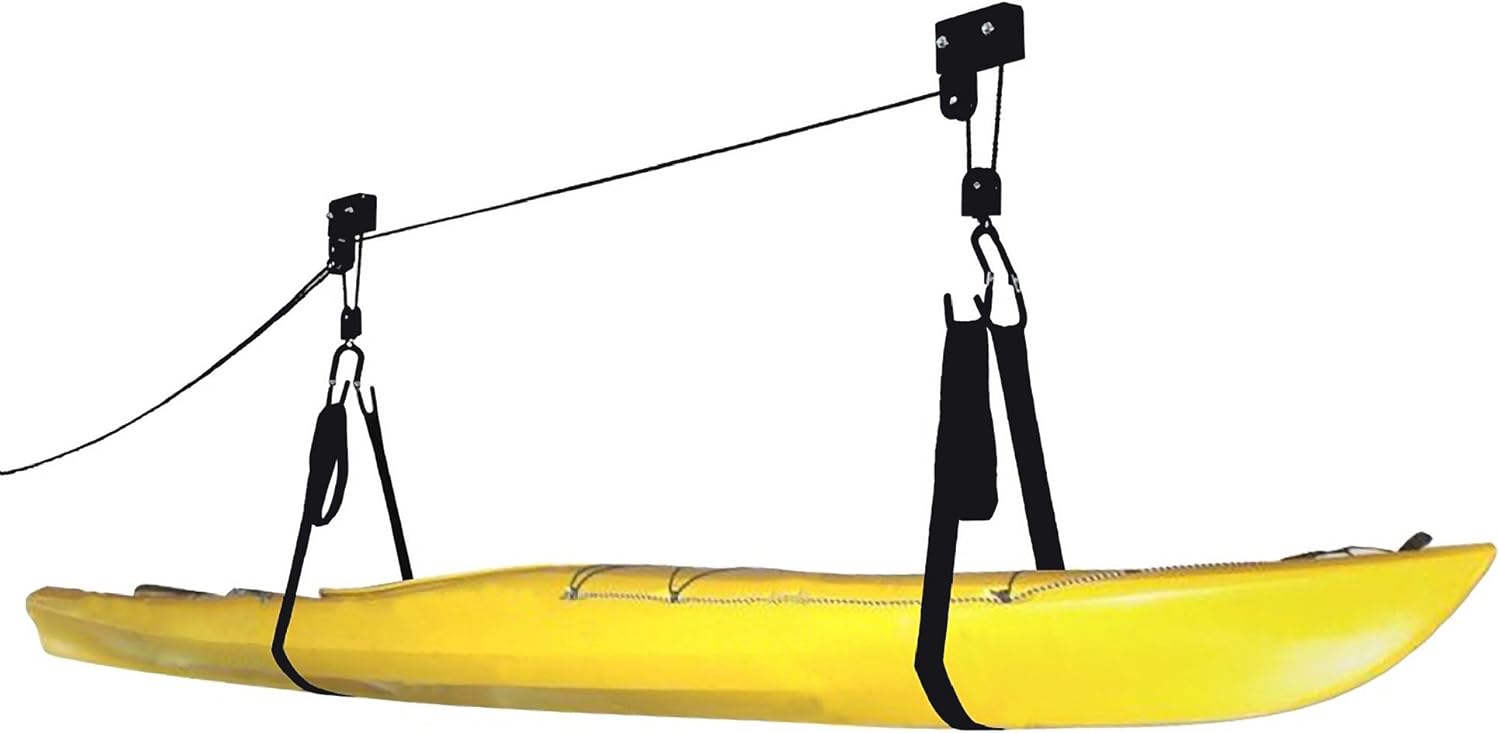
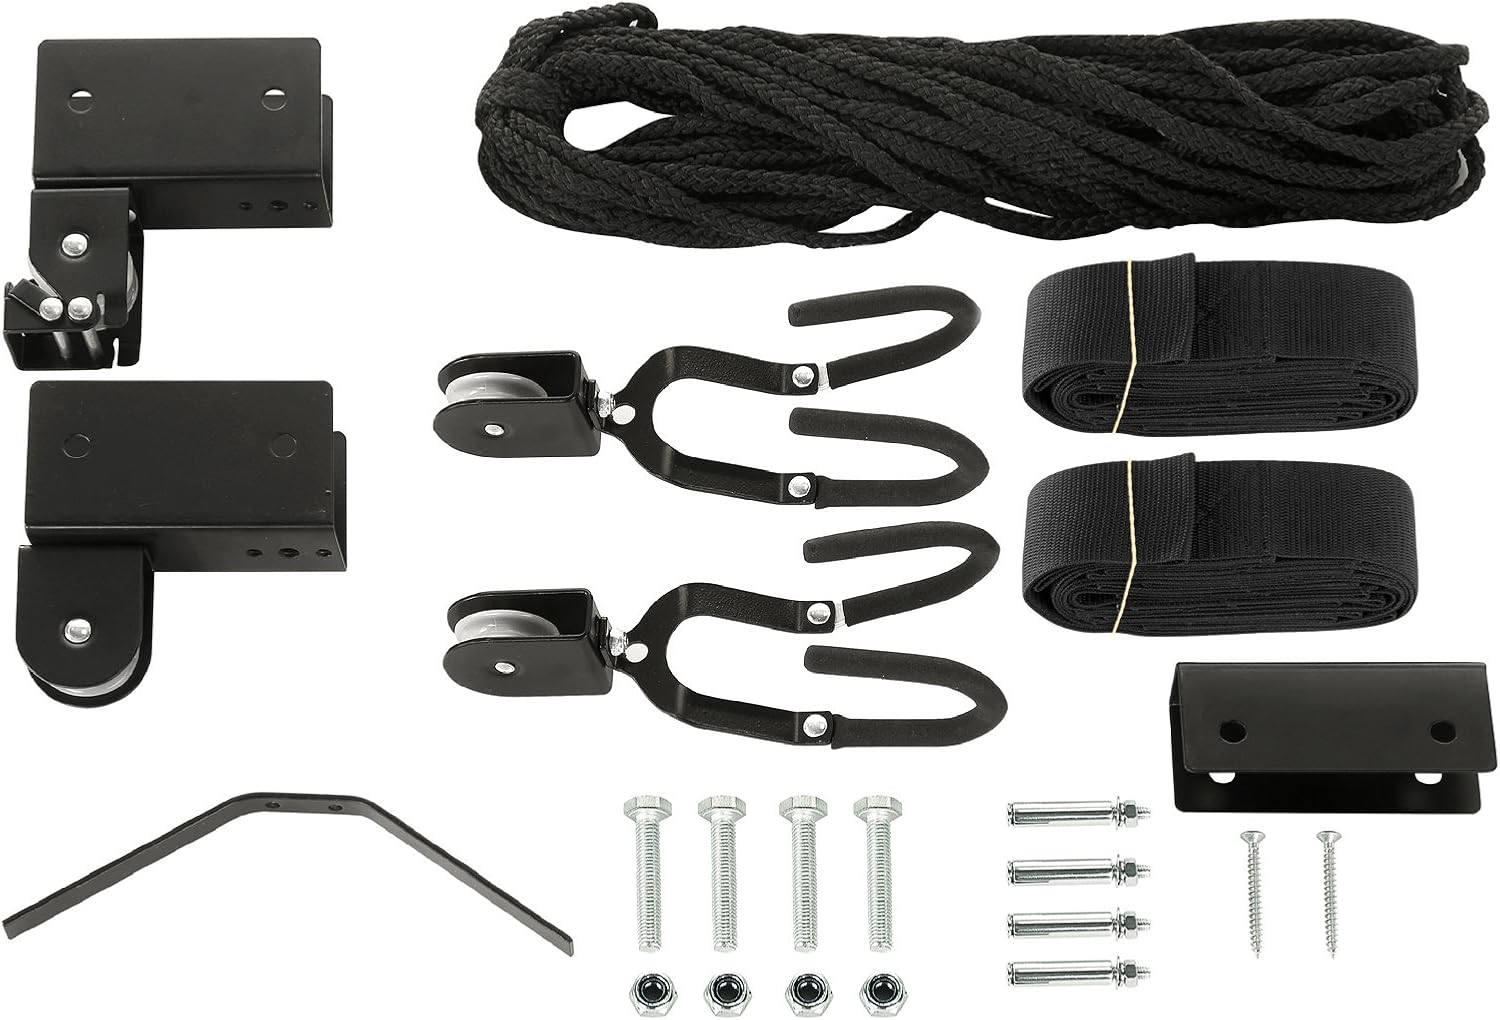
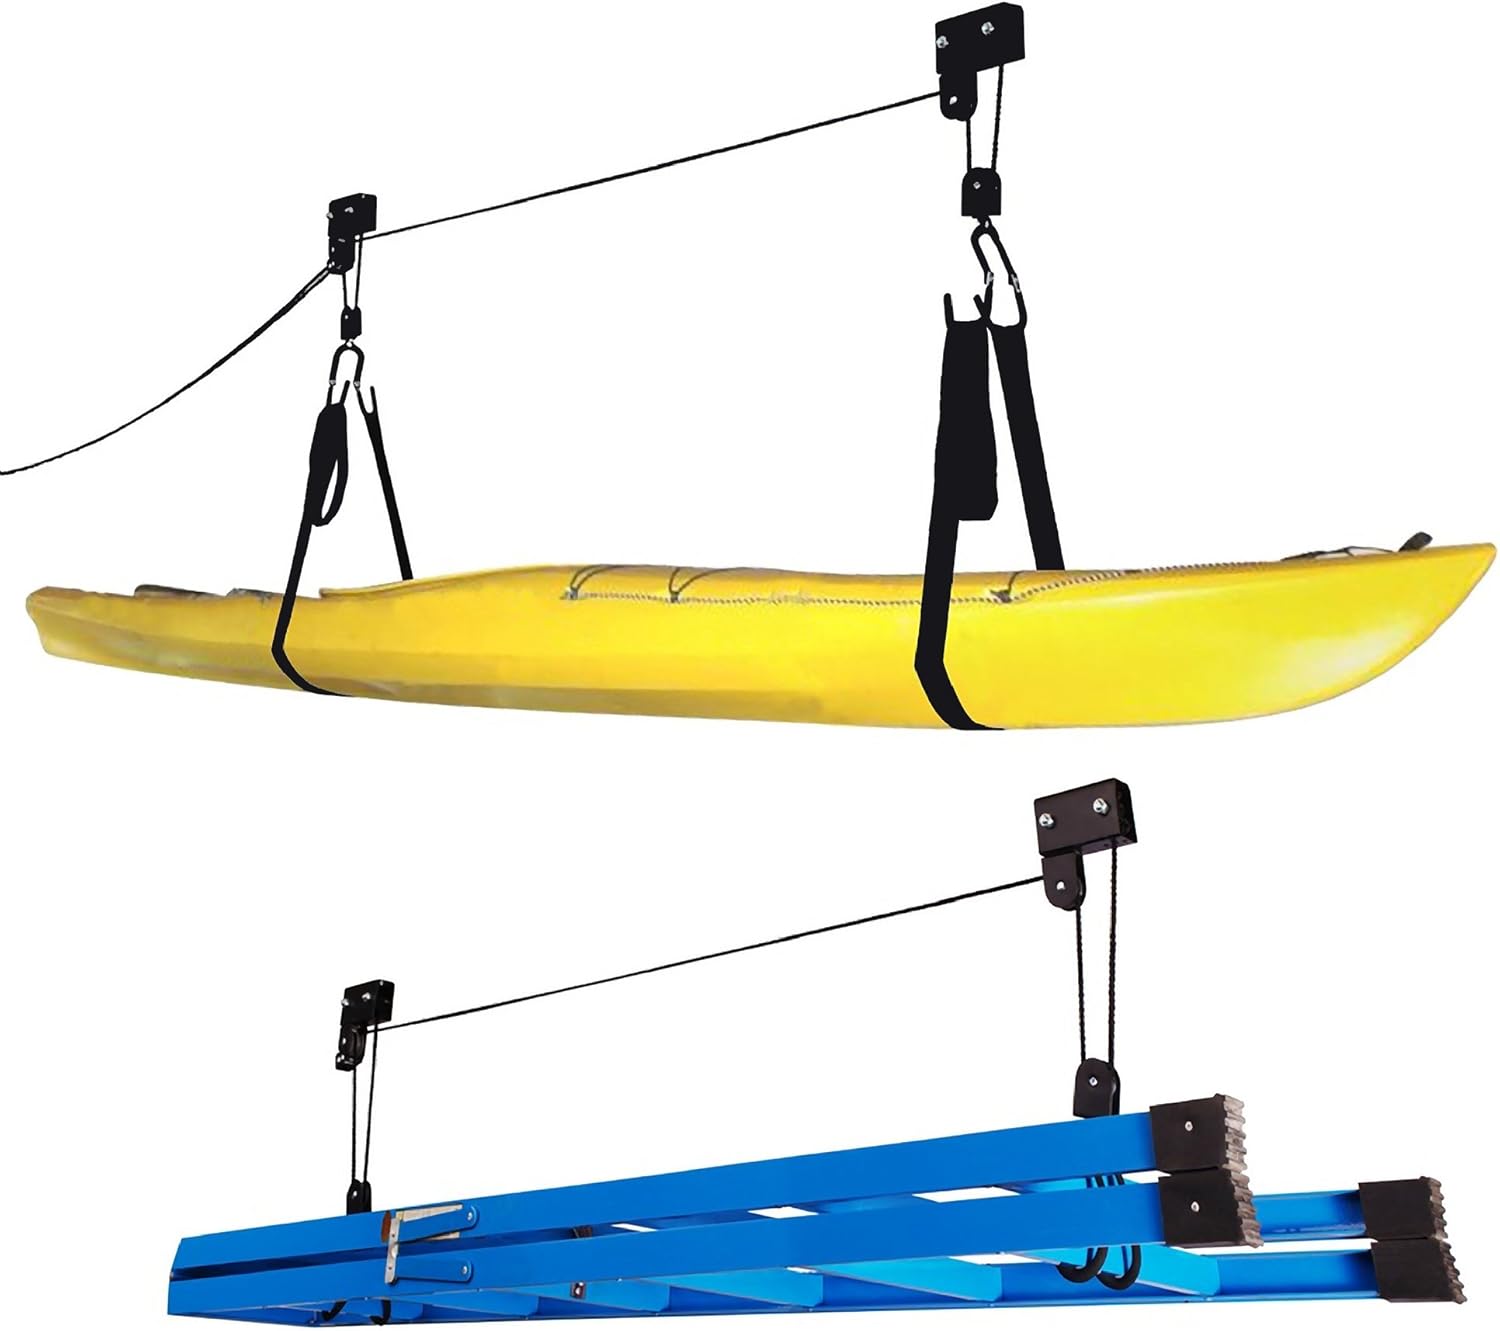
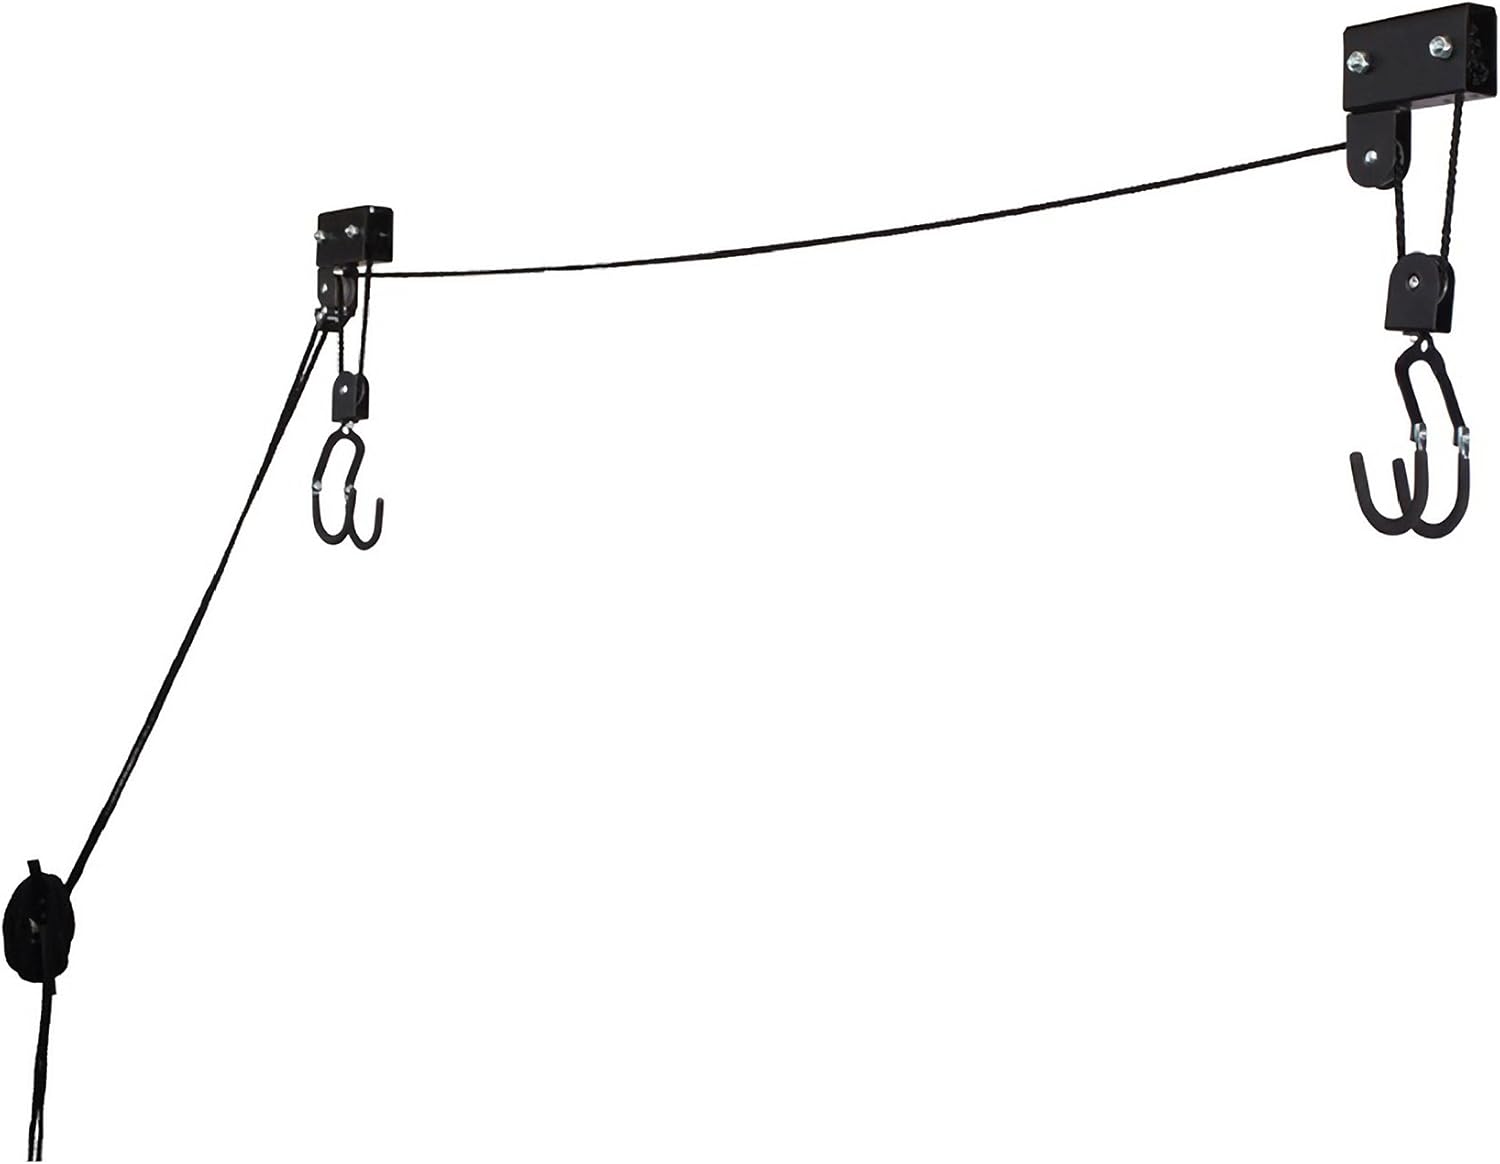
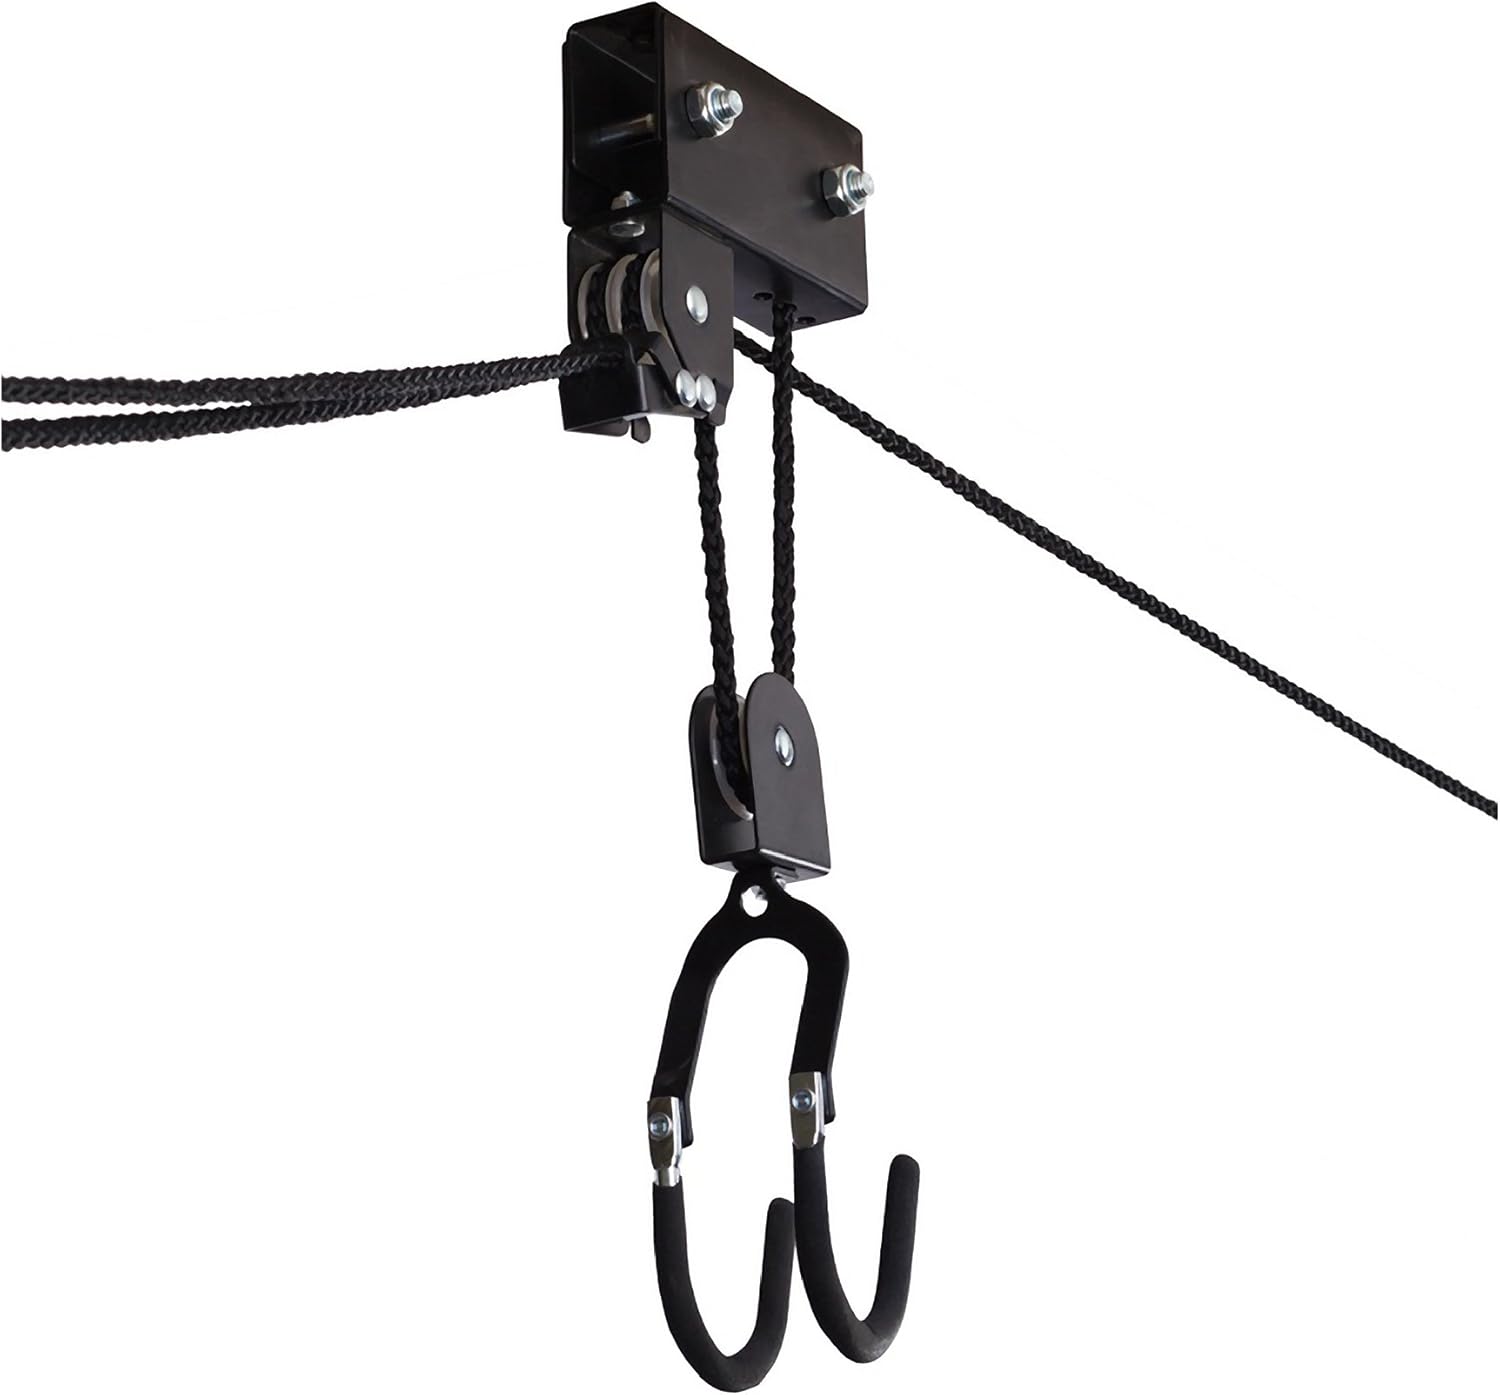
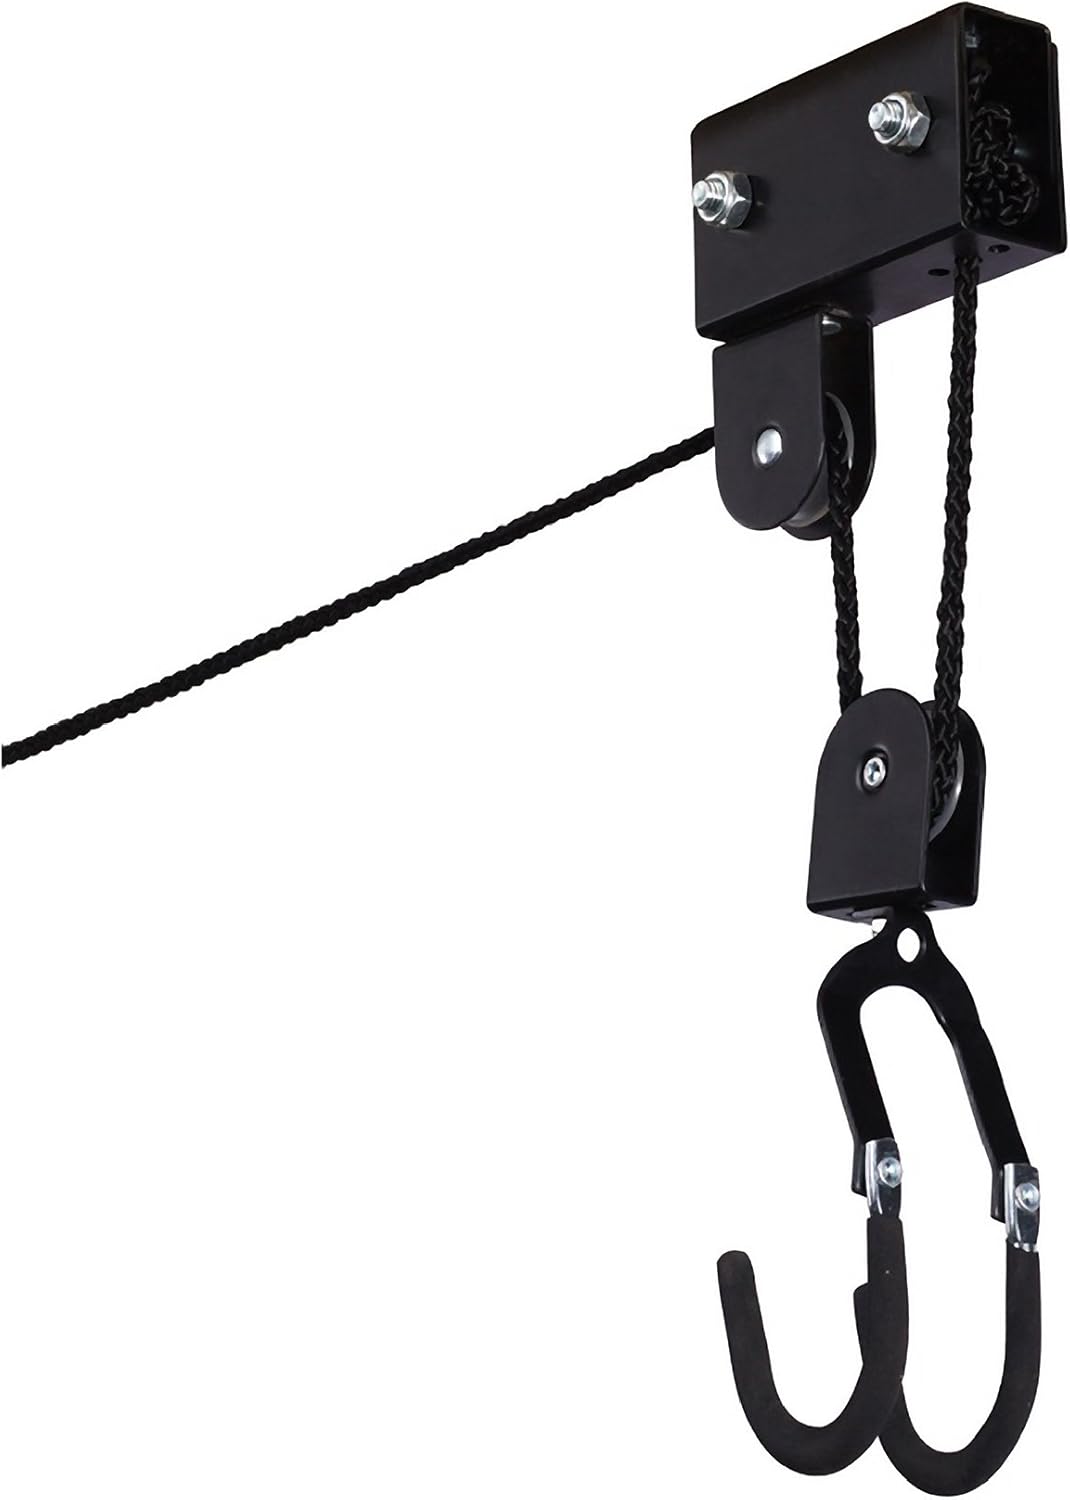
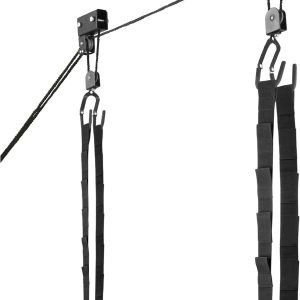
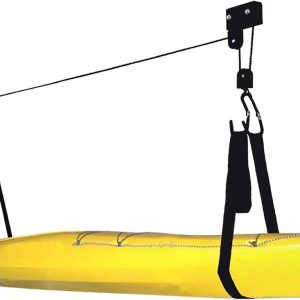
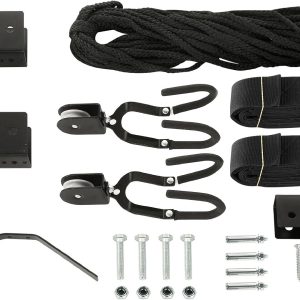
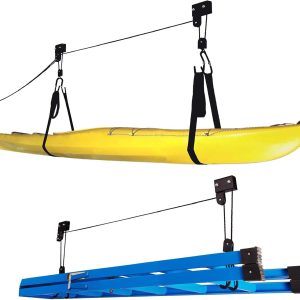
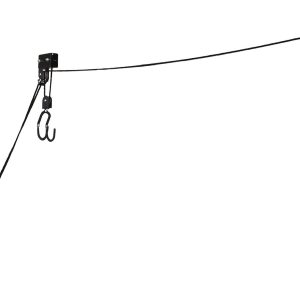
Easily store your kayak, bike, canoe, or ladder overhead and out of the way with the Kayak Storage Hoist by Rad Sportz. Smooth pulleys and latches make lifting heavy items a snap, while the exclusive rope locking mechanism prevents unwanted release and can suspend up to 125-pounds. Please note, you can mount this item as pictured on a 2 X 4 and screw the 2 X 4 to the joist or mount it right to the joist itself. The ceiling storage hoist is ideal for creating storage in your garage or shed. which we ensure by applying a rigorous quality control process. Look for our logo on the packaging for every one of our products.
►RUBBER COATED HOOKS – Hooks are designed with a rubber coating to protect from scratches. Durable straps ensure that your kayak is secure and will not fail. We guarantee it.
►EASY TO INSTALL – Mount to your ceiling joist or rafter and so easy to use. With only the minimum of tools you can have your kayak hanging in your garage in no time.
►ROBUST ENGINEERING – allows you to lift heavy products, up to 125lb. Capacity. This is the kayak hoist that all the other are trying to copy. We don’t cut corners. This is the original RAD kayak hoist you’ve heard about.
►INDOOR USE – For indoor ceilings up to 12 ft. high. Once the kayak is out of the way you free up so much floor space you won’t know what to do with it all.
►SAFETY LOCKS – Safe locking mechanism prevents accidental release. No one wants to come home and find their kayak has fallen to the floor. The Rad Kayak Hoist is safe enough to park your car under.
8 reviews for Kayak Storage Hoist – Overhead Pulley System with 125lb Capacity for
Add a review
Related products


Sports and Outdoor
TideWe Hunting Rangefinder with Rechargeable Battery, 700Y Camo Laser Range
Sports and Outdoor
Raleigh Bikes Alysa 24 Kids Flat Bar Road Bike for Girls Youth 8-12 Years

Sports and Outdoor
Callaway Golf Paradym AI Smoke Iron Set (Right Hand, 5-PW, Steel, Regular)
Sports and Outdoor
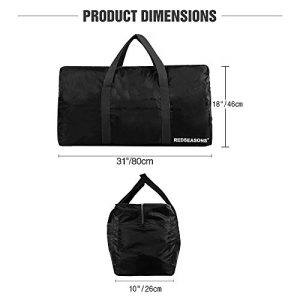
REDSEASONS Extra Large Duffle Bag Lightweight, 96L Travel Duffle Bag


Sports and Outdoor
Camco Life is Better at The Campsite Nesting Bowl Set with Lids | Great for
Prof Daddy –
Fantastic value
I just bought this to get my Tsunami 12 w/rudder out of the way. If you are not trying to lift 200 lbs this thing is awesome. Plenty sturdy enough to lift kayak. I installed it under the ceiling of a 10 x 12 pavillion for want of a better word for this small pole barn. Since it the ceiling is 1/2 inch plywood I was tempted to just screw it right to the plywood but that is nailed in place instead of screwed. Instead I used 3″ deck screws to fasten 1×4 oak, pre-drilling the holes, and screwing into the collar ties of the roof rafters. The collar ties were on 2ft centers so I used (2) 26″ sections. Oak between 2 collar ties is plenty to hold this weight and the 4ft in between does nothing so why waste the wood. I used the oak because that was what I had. If I had had 2x4s handy I would have used those. The lag screws which came with it are the correct length for using 2×4 material. I put the whole thing up by myself and it was simple, perhaps because I used the 26″ boards instead of 6ft plus boards. I screwed I pre-drilled holes so that the pulley brackets were 6ft apart and screwed those up with lags ( bought shorter lags which were threaded all the way to the head because I used 3/4 oak. I wanted the threads to engage the oak not just the plywood behind it).After that simply attached to pulleys with the through bolts provided. Since the ceiling of the pavillion is pretty high, I ran the rope through as one piece, going through the pulleys as instructions describe but then threaded the bitter end back up through the brake and pulleys to knot it through the hole. I wanted to make sure there was wnough rope for the main system before cutting it. I then pulled 6ft of rope clear from the back pulley, cutting it with a rope cutting soldering iron. I used this 6ft to make the restrictor between the pulleys. The only issue I had was despite pre-drilling the first hole for the cleat, then screw snapped off at the head using an 18 volt Ryobi impact gun ( which I use for virtually every screw I put in anything). I used some Stainless panhead screws I had to put the cleat up.The brake is excellent and makes it much easier to cleat off because you don’t have hold up the weight of the kayak while cleating off as well as uncleating. You do have release one rope at a time to bring the kayak down until there is some space between it and the ceiling so you can pull the line downand a little toward the other pulley so the brake stays released. When it’s up tight against the ceiling it won’t release both lines at the same time. Pull on one line to keep the brake off while letting out the other line to lower one end of the kayak, Reverse the process with the other line. When it’s got a couple feet of clearance you can lower both ends at once. The only concern I have is that the brake essentially pinches the lines against the pulleys so I wonder how this will wear the lines over time. The line seems to be decent woven nylon line so chafe may nerver be an issue.I may get a few more of these to hang other things things like a tadpole trike. Well made for what it’s designed to do, in my opinion. The only problem I could possibly anticipate anyone having with this is if they try to lift too much weight. It’s for a kayak not an engine block.
James Williams –
Sturdy and Easy-to-Use Hoist for Kayak Storage
The Kayak Storage Hoist has been a game-changer for organizing my garage and keeping my kayak out of the way. With a 125lb capacity, it handles my 12-foot kayak with ease, and the pulley system makes lifting and lowering it surprisingly effortless.The installation instructions were clear, and all the necessary hardware was included. Once mounted, the system feels secure and stable. I especially appreciate the rubber-coated hooks that grip the kayak without scratching it. The locking mechanism adds peace of mind, keeping the kayak safely in place when hoisted.This hoist isnât just for kayaksâitâs versatile enough for bikes and ladders too, but I primarily use it for my kayak, and it works perfectly. It has freed up a ton of floor space in my garage, and I canât recommend it enough for anyone who needs a simple, reliable storage solution for their gear!
Dad Reviews it –
A game of inches, but can’t beat it for the price!
I needed a better solution for quick and easy lowering and raising the kayaks (isn’t that why your reading this?) . I have 10’6″ ceiling in my garage and thought this would be a great tool to add to my overall garage organization but make my kayaks more accessible.1. Out of the box, the instructions are terrible (which most other reviews share- haven’t been changed as of DEC 15, 2016.. Hah. Pretty sure the only reason they included them were for all the legal disclaimers, etc.That said, we live in a day and age where YouTube will tell you anything you need to know about anything. If you do a search of RAD kayak hoist, the first video is 4 minutes and will walk you through it. So the instructions, well- toss them aside and get going.2. Check your ceiling joist to find out which direction they run.. Of course my floor joists didn’t run the right way and I had to add a 2×4. Not a big deal, but if you don’t have the tools on hand, it can add a day or 2 to the install. (you will need your own 2×4, lag bolts, washers, tape measure, drill, and drill bit.) the instructions do tell you what to buy if you need to get them to install the hoist. But I already knew this, and my board was already put up prior to the item arriving.3. Item was very well packaged, and all tools/bolts etc. We’re accounted for. That said I’ve heard some reviews about not knowing what bolt/screw went where. It’s easy.You get 4 wood lag screws (hex head) for attaching the 2 brackets (without the pulleys) to the 2×4 or joist. 4 bolts to attach the pulley mount to the brackets. And then 2 basic Phillips head wood screws to attach the cleat to the wall.4. The threading of the rope through the pulley is the most confusing part of the install, but refer back to #1 above. Watch the video and your good to go!5. Once everything was attached and assembled, I was impressed with how easy it was to raise and lower the kayak. (one handed for 60lb kayak) The brake works as designed, and gives me greater peace of mind knowing the cleat and brake will keep the item from falling..****READ THIS IF YOU SKIPPED ABOVE IF YOUR WORRIED ABOUT THE 1 STAR REVIEWS****6. THE only reason I couldn’t give this item 5 stars is because of the straps that attach your kayak to the hooks of the pulley.. I’ve read many 1 star reviews about the straps failing(breaking) or completely sliding off the end of the kayak. I can say, from inspection the straps appear well made. I’m not certain how they would fail, but like all things – sometimes a little user TLC can go a long way. However, I did experience the straps sliding issue. It was a nuisance at best, and added to the overall frustration of my process. It was also difficult to get the hooks to sit in tight to the kayak, to keep the straps in place and not slide toward the end of the Kayak. It’s not how it was designed (I know, reference pic 1 to see how much space it adds between the kayak and pulley.***GAME OF INCHES***After having successfully attached the strap where I felt they wouldn’t slide off (that’ll do I said to myself) , I easily raised the kayak to the ceiling. Now- here was the most frustrating part for me.I prefer to place my kayaks above the garage doors, because above them is a lot of wasted space. My old system used regular lashing straps (set of 2 on amazon is only $8)and eye bolts to raise my kayaks to the ceiling prior to using the hoist with no clearance issues. But a lot of shoulder problems from having to push up the kayak, and pull on the strap simultaneously…. The issue: the 2×4 added wasted space to the overall distance between the ceiling and kayak…and also the hooks that connect to the straps also added about 4-6 inches from the flex in the hooks. ***see photos.The first photo shows how low the kayak hangs when hooked to the straps. You can see there’s a lot of space between the pulley and the hooks and the kayak. I knew it would be close, and I was right. It hung about 3 inches too low and my garage door would ride along the bottom of my kayaks on the way up. Obviously not what I wanted.***MY STRAP SOLUTION ***Looking at the kayak, I believed if I could get the kayak to raise 4 inches higher, I would achieve clearance and allow the garage door to freely raise and lower.I used the original lashing straps ($8 on amazon) which had hooks. This solved two problems. The first being, when this strap is cinched…. it’s tight. And it doesn’t move on the listing kayak.Second, when you press the hooks out flat and connect them to the eyelets of the strap not only is it secure, but it also keeps the hooks flat against my Kayak. Successfully decreasing the total space about 4″, and thus hanging high enough above my garage door to allow it to freely move up and down without rubbing or bumping.Overall, I’m very happy with my purchase as long as the pulleys themselves don’t fail.Overall I’d say 3 stars, because hey, the product works. It could be improved (RAD FEEL FREE TO ADD THESE lashing STRAPS AND PAY ME An INTELLECTUAL FEE FOR SOLVING YOUR BIGGEST Problem)But, In the end I placed 4 stars because of the price. It was the best price I could find. Most of you won’t be foolish to try and hang above your garage doors, but the straps are a bit frustrating and could be improved.I put pictures of the lashing straps hooks I use if you want to upgrade. I got them also from Amazon. They have a 300 lb safe working load. (over kill, but again. Peace of mind)Hope this helps someone solve there concerns about strap breaking or clearance issues if you too are playing the game of inches!!!Total time on project? 2 nights or 4 hrs.. And 1 day waiting for the AHAAAAAA moment and 5 minute fix to my problem.Hope it helps.
Edwin –
Excelente artÃculo. Lo he utilizado para un portaequiaje de una camioneta. Sólo tener en cuenta que con los ganchos incluidos el portaequipaje cuelga demasiado bajo: tuve que elaborar un par de soleras para pegar más a techo el portaequipaje. Las correas incluidas son de primera calidad, pero para pegar aún más a techo tuve que ocupar un par de eslingas con matraca. Además sugiero taquetes expansivos para el techo. Con estas modificaciones ha que dado perfecto.
olive76 –
Mon kayack est stocké pour l’hiver dans mon garage, super gain de place.
Jesús –
Fácil de instalar y de usar.
Rainer Herden –
Hat alles geklappt. Qualität ist gut und erfüllt seinen Zweck zu einem ordentlichen Preis.Danke
Fredrik öster –
Funkar kanon. Kunde ha varit bättre ritning.